Router#
Usually we create SPAs (Single Page Apps). Hence we need a router. The included router is very simple.
First, define an outlet where the components appear:
<div n-router-outlet></div>
Any kind of parent element will do. The router code sets the property innerHTML. Components, that are being used to provide router content need registration too. They must have a name, too, because that's the way the router internally activates the component.
There is just one default outlet. See further below for using named outlets.
Register Routes#
The following code shows how to register routes:
let routes = {
  '/': { component: DemoComponent },
  '/about': { component: AboutComponent },
  '/demo': { component: DemoComponent },
  '/contact': { component: ContactComponent },
  '**': { component: DemoComponent },
};

GlobalProvider.bootstrap({
  components: [DemoComponent, AboutComponent, ContactComponent, MainComponent],
  routes: routes,
});
The first entry '/': { component: DemoComponent }, shall always exist, it's the default route loaded on start. It's being recognized by the '/' key (the position in the array doesn't matter).
The entry '**': { component: DemoComponent } is optional and defines a fallback in case an invalid path is being used.
You can shorten the property in the bootstrap script, too:
const components = [DemoComponent, AboutComponent, ContactComponent, MainComponent];

GlobalProvider.bootstrap({
  components,
  routes,
});
Using Routes#
To activate a router you need a hyperlink. The router's code looks for a click onto an anchor tag. An appropriate code snippet to use the routes looks like this:
<a href="#/" n-link>Home</a>
<a href="#/about" n-link>About</a>
<a href="#/demo" n-link>Demo</a>
<a href="#/contact" n-link>Contact</a>
<div n-router-outlet></div>
The important part here is the n-link attribute. Using this you can distinguish between navigation links for routing and any other anchor tag. You can also use a <button> element or any other. Internally it's just a click-event that's handled and that checks for the attribute, then.
Please note the hash sign (#). It's required. No code or strategies here, write it by yourself and then enjoy the very small footprint of the outcome.
Pro Tip! Import the router definition and use additional fields to create a menu directly from router configuration.
If you have some sort of CSS framework running that provides support for menu navigation by classes, just add the class for the currently active element to the n-link attribute like this:
<a href="#/" n-link="active">Home</a>
<a href="#/about" n-link="active">About</a>
<a href="#/demo" n-link="active">Demo</a>
<a href="#/contact" n-link="active">Contact</a>
<div n-router-outlet></div>
After this, by clicking the hyperlink, the class "active" will be added to the anchor tag. Any click on any n-link decorated tag will remove all these classes from all these elements, first. The class' name can differ and you can add multiple classes. It's treated as string internally.
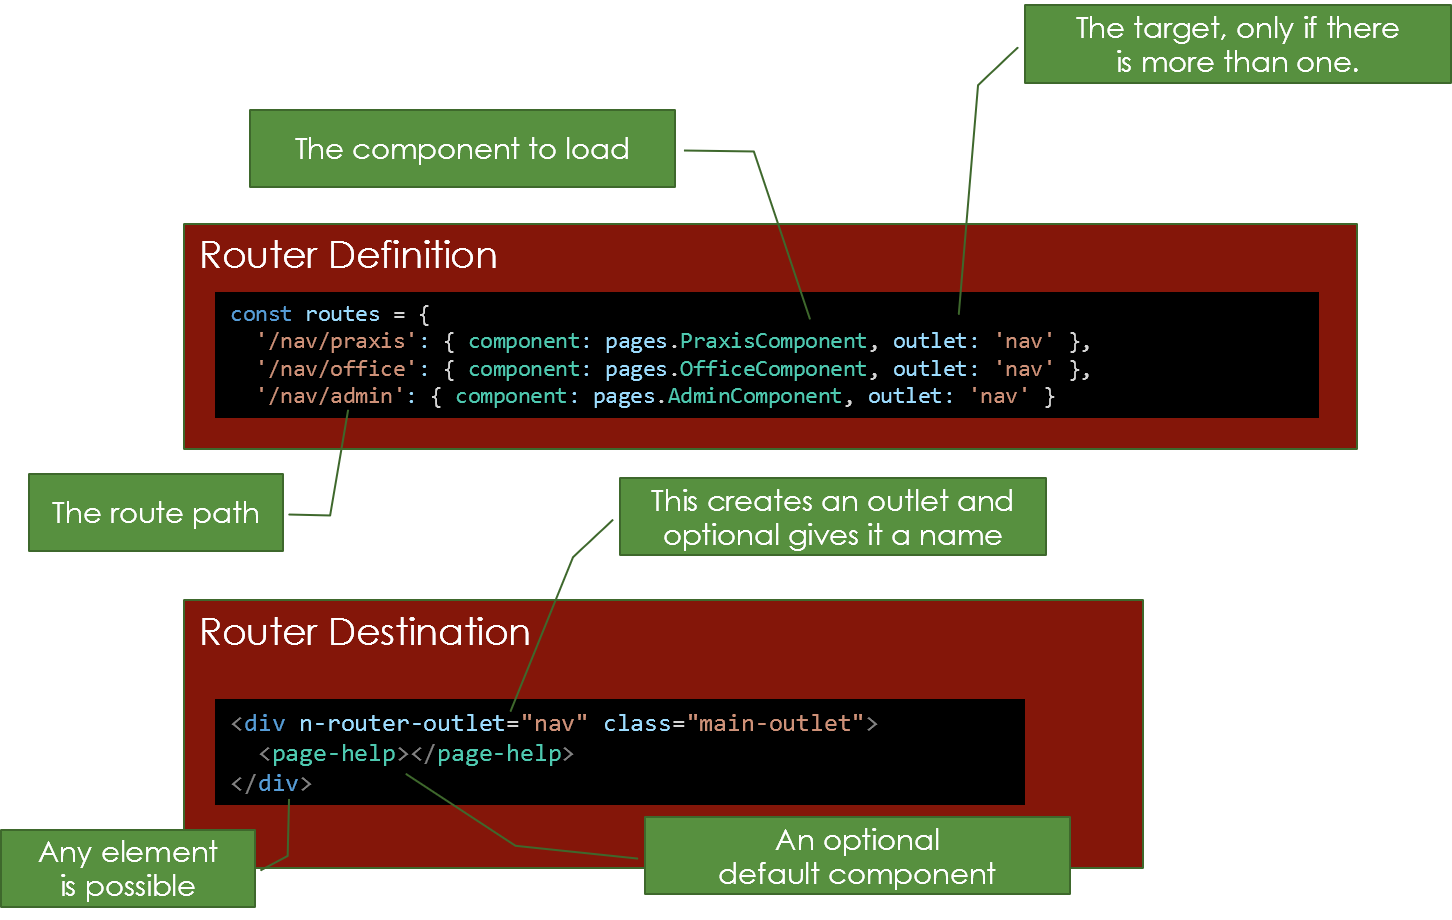
Named Routes#
The underlying route definition, the type Routes, allows two additional fields (outlet and data):
const routes: Routes = {
  '/': { component: HomeComponent, outlet: 'main' },
  '/docu': {
    component: DocuComponent,
    outlet: 'main',
    data: { notlocal: true}
    },
  '/about': { component: AboutComponent, outlet: 'main' },
  '/demo': { component: DemoComponent, outlet: 'main',
  '/router': { component: RouterComponent, outlet: 'main' },
  '/router/page1': { component: Page1Component, outlet: 'router' },
  '/router/page2': { component: Page2Component, outlet: 'router' },
  '/router/page2/other': { component: Page2Component, outlet: 'other' },
  '/router/page3/other': { component: Page3Component, outlet: 'other' },
  '/contact': { component: ContactComponent }
};
With outlet you can define a named outlet. If you use this, you must name all routes as there is no fallback currently. The route outlet might reside everywhere. It may look like this:
<div n-router-outlet="other"></div>
If the route's components deliver <li> elements, you can also use something like this to build well formatted HTML:
<ul n-router-outlet="other"></div>
There is no difference on the link side, the decision to address another outlet is made in the configuration only. If the outlet doesn't exist nothing happens and a warning appears on the console (in DEBUG mode).
In the example I use routes that look like child routes. That's a hint for the intended behavior, but it's technically not necessary doing so. The resolver is very simple and doesn't care about routes, it's just matching the string and seeking the outlet.
Additional Data#
The last example showed another field data. This is a dictionary with arbitrary data just stored here. If you setup a navigation dynamically based on the configuration data you can control the behavior in a well defined way. However, there is no code intercepting these data, it's the task of the implementer to do something useful here.
Special Values#
If you use data: { title: 'Some Title' } the value in the field title is being copied to the websites title field. That way it appears on the tab (or header bar in Electron). If it's omitted, it's not being set at all.
Navigate to Route#
You can navigate by code:
GlobalProvider.navigateRoute('/my-route');
The outlet is pulled from configuration, but if provided as second parameter it can be overwritten.
Hint: In the link elements you use the '#' prefix. In the
navigateRoutemethod this is not necessary and hence not allowed.
Route Events#
The router fires two events, available through the static GlobalProvider class like this:
GlobalProvider.routerAction.addEventListener('navigate', (evt) => {
  const route = evt.detail;
  evt.cancel = true;   // optionally cancel before execution
}
GlobalProvider.routerAction.addEventListener('navigated', (evt) => {
  const route = evt.detail;
  // this event can't be cancelled
}
If you have a dynamic component and you set the event handler, don't forget to remove the event handler in the dispose callback.
Deal with Parameters#
Routes can have parameters. These parameters can be optional. The handling is quite flexible. Internally the path instruction is rewritten into a regular expression. Everything not epxlicitly recognized will appear in the epxression, then. That means you have both, restrictions and advantages. First, any path characters must match the RegExp conditions, with two exceptions. First, / is converted to be valid in the expression. Second, : is the divider for a parameter and replace the name with a sufficient placeholder. Path instructions look typically like this:
let routes = {
  'path/:id': { component: RoutedComponent },
};
Now you need to get access to the router data in the component. The rules of a constructor for a Web Component are pretty strict. One rule is that you are not allowed to pass in any arguments into the constructor. To overcome this the router supports attributes and properties instead. They are available immediately after the constructor call, but not within. There are two ways to access the parameters.
Generic Parameters#
The router always sets an attribute named routeParams. It's set automatically, regardless it's being observed or not.
const obj = this.getAttribute('routeParams');
It's of type object and contains an array of parameter objects, type RouteParam. Typically it looks like this:
[
  {
    parameter: 'type',
    optional: false,
    start: 6,
    value: 'simple',
  },
];
The data are as follows:
- parameter: The name of the parameter as it is written in the router definition.
- optional: Indicates whether the parameter was declared as optional.
- start: The position in the router path definition, a zero based index.
- value: The actual value from the given hash. This might be empty if the parameter is optional.
Direct Access#
Usually you may be interested in a specific parameter value only and the internal values of the router logic doesn't matter. Than you can define a mapping in the router definition to write the actual value into an attribute. Be aware that the type is not handled here and such router parameters will always treated as string values.
This is a single router path definition with such an additional mapping:
'/todo/:type': { component: ToDoAppDemoComponent, map: { 'type': 'todokind' } },
The essential part is the map property. The left side is the name in the path string ('type' in the example), the right side is the attribute the value is written into. The access is possible using standard HTML 5 API.
const str = this.getAttribute('todokind');
Observing Parameters#
Despite the fact that the parameter mapping is not async, the change can be monitored through the @Properties decorator. Just make any of the mentioned attributes observable, either the whole mapping or just a single mapped parameter. Even if the loading of the component is not enforced the attribute change will happen and the component renders again. The advantage of an attribute is the fact that you can put it in the list of observed attributes and any change will call the render method implicitly.
@Properties({ todokind: ''})