The Flux Store#
This module is the store implementation, a simple flux variant without the burden of Redux. It strictly follows the flux pattern and brings, ones fully understood, a great amount of strict programming style to your application. It brings state to your single page app (SPA). Outside of a SPA it's not useful.
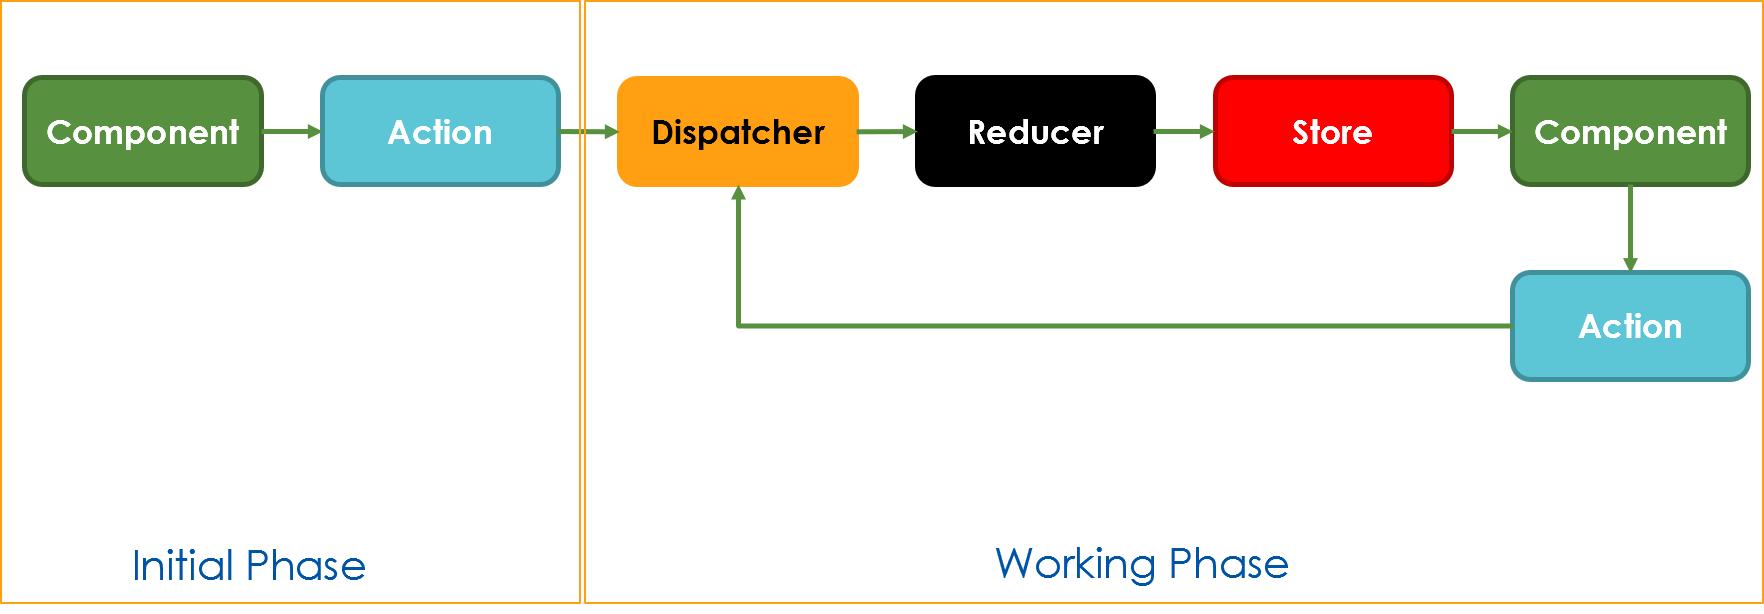
How it works#
It's very much like Redux, but makes use of decorators to write less code. It's a good strategy to create one global store in your app. Leave it empty if there are no global actions, but make it global if you have such actions.
Then, define three parts for each implementation:
- Actions that the component offers (such as SEARCH, LOAD, SET, REMOVE, you name it)
- Reducers that are pure function calls that do what your business logic requires (change data, call services)
- A State Object that holds all the data. The reducer can change the state, but nobody else can
In the component you have two tasks:
- Dispatch actions and add payload if required.
- Listen for changes in the store to know when an reducer finished it's task.
An async load must not be split-up. The calls are async, hence the state change may appear later, but nonetheless it lands in the component eventually.
Actions#
Define the capabilities of your app, along with some default or initial value. In this example I use Symbol to define unique constants that are being used for any further request of an action.
export const INC = Symbol('INC');
export const DEC = Symbol('DEC');
export const SET = Symbol('SET');

export default {
  // initial value of payload,
  // this can be omitted if you don't care
  [INC]: () => 1,
  [DEC]: () => -1,
  SET
};
The following figure shows the relevant parts of the action definition:
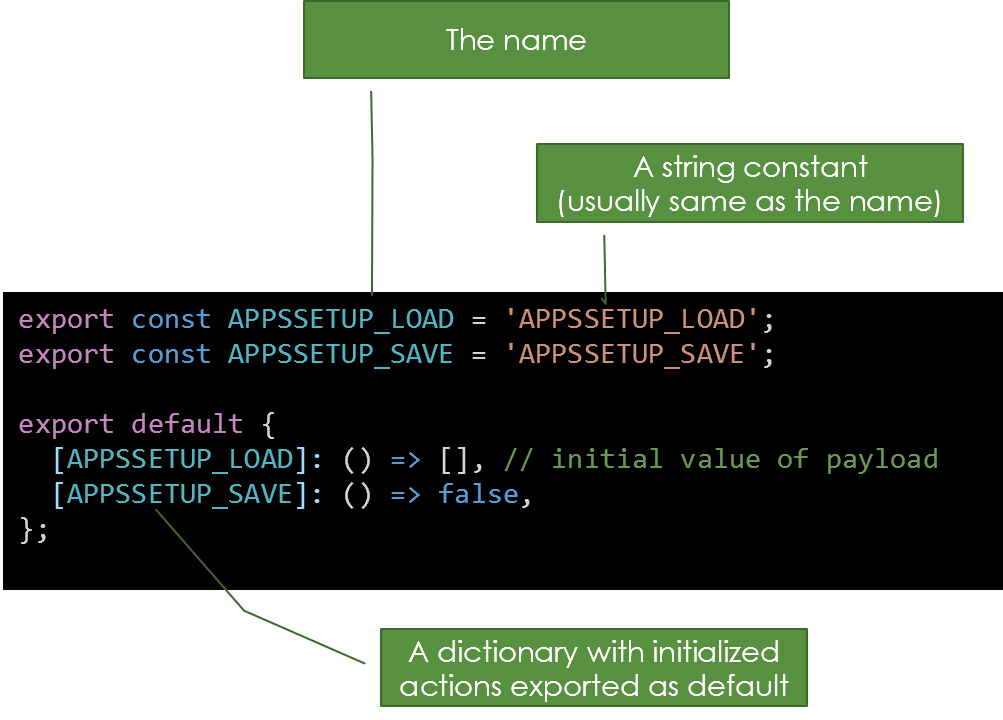
Why using actions? It's convenient to have typed constants in the editor and use easy to remember names without the chance to create mistakenly typos.
Reducer#
Define, what happens if an action is being dispatched:
import { INC, DEC } from '../actions/counter.action';
import stateType from '../states/counter.state';

export default {
    [INC]: (state: stateType, payload: number) => {
      state.counter = state.counter + payload;
      return state;
    },
    [DEC]: (state: stateType, payload: number) => {
      state.counter = state.counter - payload;
      return state;
    }
};
The following figure shows the relevant parts of the reducer definition:
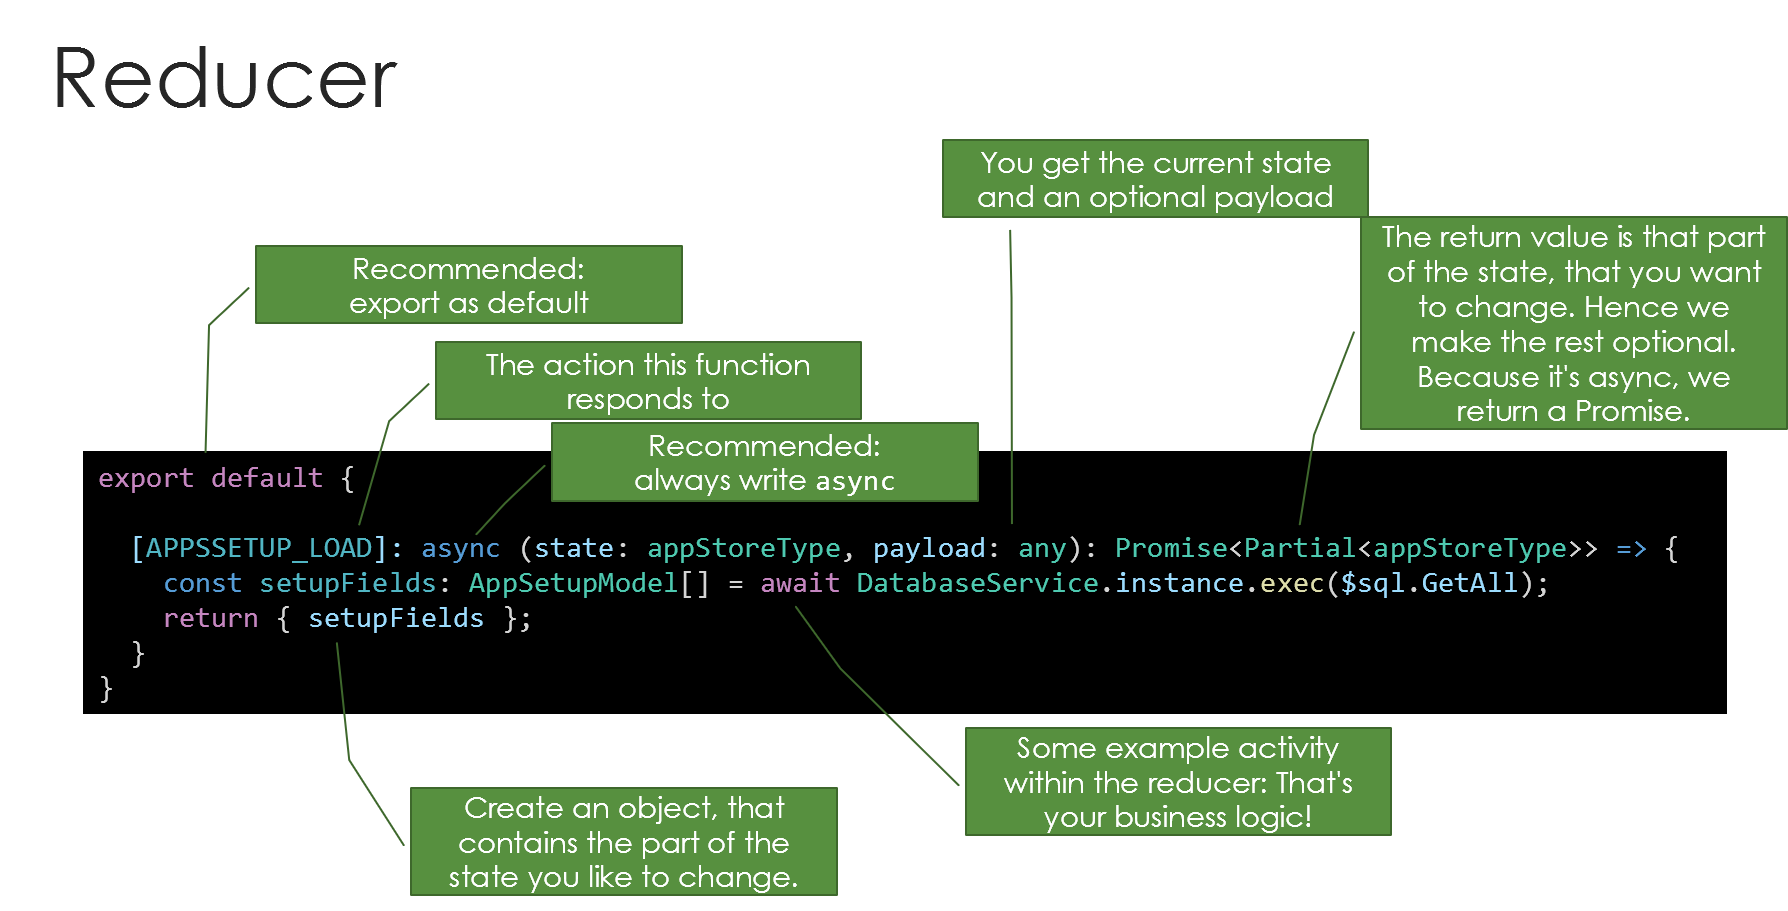
The returned payload is the whole store object by reference. The type for the store is optional and helps elevating the power of TypeScript and getting a type safe store.
Why using reducers at all? Pure function calls are the foundation of a side effect free business layer. You have exactly one location where the logic goes - the reducer. That's said, from now on you will know where to have logic, where to have UI, and where to store everything.
Reducers can be sync or async, every function can be made as you like.
Return Value Considerations#
The return value is an object that contains the fragments of the store that need to be changed. Through subscriptions this is the way to inform other instances that something happened. But be careful with setting multiple values in one single step. The store logic will execute property by property and immediately publish the change event. A subscriber will receive the changes in the exact order of the properties in the reducers returns value. If the subscriber receives the first property's change event, the ne value is provided. However, the remaining values are not yet set, and hence the store is in an intermediate state. You must wait for all subscribers to get their final values. The best way to avoid hassle here is to avoid returning multiple values from a single reducer function.
Store and Dispatcher#
The store holds the state, provides a dispatch function and fires events in case a store value changes. First, the store can by defined by types, but this is an option and you may decide to go with a simple object just for the sake of simplicity.

The example shows a store that consists of fragments. This allows one to use parts of the store just by using the type fragments.
// This is a store fragment
export interface DemoTitleStore {
  title: string;
}
// This is a store fragment
export interface CounterStore {
  counter: number;
}
// This is the complete store, which can be used complete or in fragments
type store = CounterStore & DemoTitleStore;
// This is for convenient access
export default store;
Now see the usage within a component. First, you must configure the store with the elements written before. As shown it's easy to combine reducers and add the various actions. To have the state typed a generic is being used.
import counterReducer from '../reducer/counter.reducer';
import setReducer from '../reducer/set.reducer';
import counterActions from '../actions/counter.action';
import storeStateType from '../states/counter.state';

const store = new Store<storeStateType>({
  actions: counterActions,
  mutations: { ...counterReducer, ...setReducer  },
  state: { counter: 0 }
});
Use the Store#
Now make the store constant available in the component, if it's not yet defined there. This particular store can handle just one single component or spread multiple components and form eventually a single source of truth for the whole application.
@CustomElement('app-store-counter')
@ProvideStore<storeStateType>(store)
export class StoreCounterComponent
       extends BaseComponent<{ cnt: number }>
       implements IStore<storeStateType> {

  constructor() {
    super();
    this.setData('cnt', 0);
    // fire if a value changes in the store,
    // takes name of the store value
    this.store.subscribe('counter', str => {
      // write to a observed property to force re-render
      this.data.cnt = str.counter;
    });
  }

  clickMeAdd(e) {
    console.log('Counter Element Click INC');
    this.store.dispatch(INC, 1);
  }

  clickMeSub(e) {
    console.log('Counter Element Click DEC');
    this.store.dispatch(DEC, 1);
  }

  clickMeSet(e) {
    console.log('Counter Element Click SET');
    this.store.dispatch(SET, 100);
  }

  render() {
    return (
      <>
        <div>
          <button type='button' n-on-click={this.clickMeAdd}>
            Add 1
          </button>
          <button type='button' n-on-click={this.clickMeSub}>
            Sub 1
          </button>
          <button type='button' n-on-click={this.clickMeSet}>
            Set 100
          </button>
        </div>
        <pre style='border: 1px solid gray;'>{this.data.cnt}</pre>
      </>
    );
  }
}
The decorator @ProvideStore<T>(storeInstance) in the example activates the store and creates an instance in the property this.store. To help TypeScript to understand the existence of this property you must implement the interface IStore<T> with the same type as used in the decorator. Now you have access and an already existing instance. The store gives you access to the two main features, dispatching actions and subscribing to changes.
Pro Tip! Combine this example with the forms module (@nyaf/forms) and get binding on element level using the
n-bindtemplate feature.